Send with your own mail server
Every email the app sends leaves with a sender identity you control, and on Pro and above it can leave from your own mail server instead of the app's. By the end of this page your emails arrive under your name, and from your own address if you run a server for it.
Before you start
- Access to the app Settings page.
- For your own server: its host, port and credentials, from whoever provides your mailbox.
Where sending is configured
- Open the app.
- Select Settings in the app navigation.
- Open the Email sending card, the first one on the page.
Everything in this card applies to your whole store: Applies to every quiz in your store: result emails and app notifications all go out with this identity. There is no per quiz sender.
A badge at the top of the card names the route your emails take right now. It reads Sending via: app default while the app sends them, and Sending via: your SMTP server once your own server is configured, tested and switched on. Read that badge rather than your settings: it reflects what the app would actually do with the next email, plan included.
Set the sender identity
Two fields, in the Sender section, available on every plan.
- Enter the name customers should see in Sender name.
- Enter your own address in Sender email address.
- Select Save.
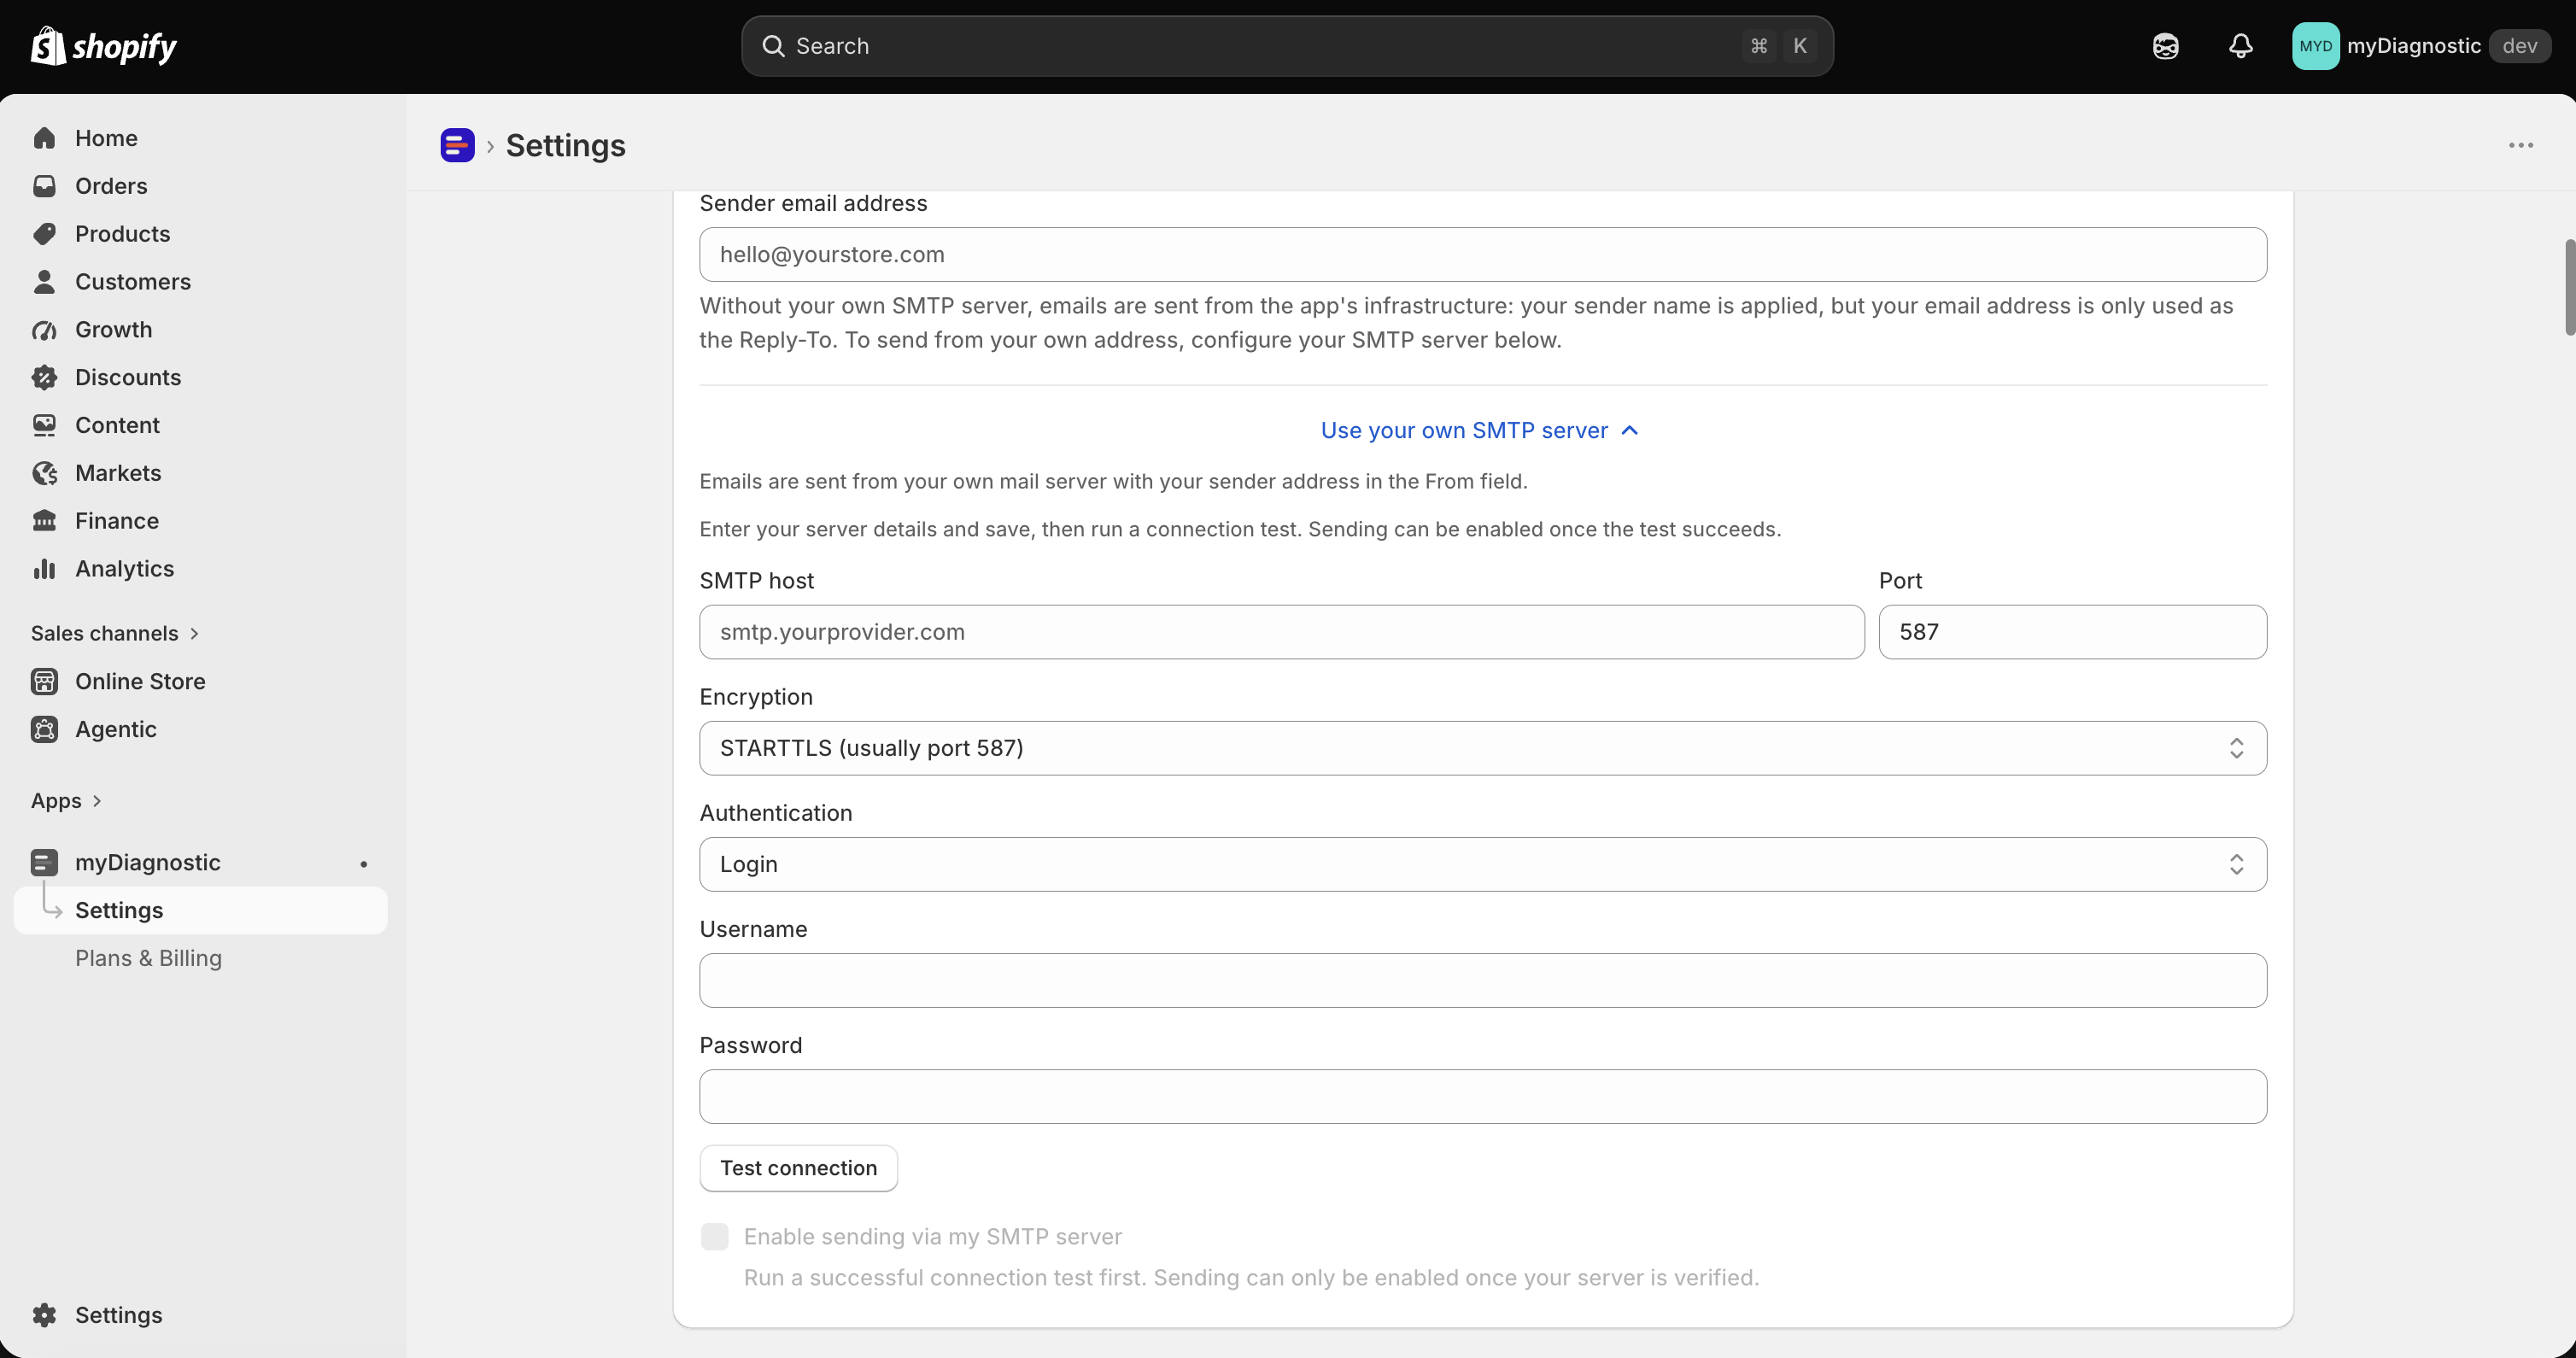
On the default route, those two are used differently, which the field says out loud: Without your own SMTP server, emails are sent from the app's infrastructure: your sender name is applied, but your email address is only used as the Reply-To.
So a customer sees your store's name in their inbox, and a reply reaches the address you set here. The sending address itself belongs to the app, because a mail service will not send from a domain it has not verified, and your domain is verified with your own provider rather than with the app's.
Leave Sender email address empty and there is no reply address at all: a customer who replies writes to the app's own sending address, which is not a mailbox you read. Fill it in even if you never intend to use your own server.
Use your own mail server Pro plan and above
On Pro and above, Use your own SMTP server opens the section that replaces the default route. Your server sends the message, and your address is what a customer sees in the From field rather than in a reply header.
Below Pro the section shows a banner in its place, with a link to the plans.
Enter your server details
- Open Use your own SMTP server.
- Enter SMTP host and Port.
- Choose Encryption: STARTTLS (usually port 587) or SSL/TLS (usually port 465).
- Choose Authentication: Login, Plain, CRAM-MD5 or No authentication.
- Enter Username and Password, unless you chose No authentication, which disables both.
- Select Save.
Your password is stored encrypted and never shown again. Once one is stored, the field reads A password is stored (encrypted). Leave blank to keep it., so you can edit a port or a username without retyping it.
Run the connection test
The card states the order to work in: Enter your server details and save, then run a connection test. Sending can be enabled once the test succeeds.
- Select Test connection.
- Read the result, and check the inbox of your sender address.
The test is a real send. It connects to your server with the details you saved and sends a message to your Sender email address, so a success means the route works end to end rather than that the port is open. On success a banner confirms it and a green badge appears next to the button, reading Connection verified with the date. On failure a red banner gives the reason your server returned, which is usually a wrong port, a refused password, or an encryption mode the server does not offer.
Test connection is disabled while you have unsaved changes, with a note reading Save your changes before testing., since the test uses what is stored rather than what is on screen.
Switch sending over
Tick Enable sending via my SMTP server, then select Save.
The checkbox stays disabled until a test has passed, explaining itself as Run a successful connection test first. Sending can only be enabled once your server is verified. The app enforces the same rule when saving, so the setting cannot be turned on by any other route.
Four things must all be true before an email actually leaves through your server: your plan includes the feature, a connection test has passed, the checkbox is on, and both a host and a sender address are set. Anything short of that sends through the app instead, quietly and without losing an email. The badge at the top of the card is where you confirm which of the two is happening.
Editing any connection detail afterwards, the host, the port, the username, the password, the encryption or the authentication mode, clears the verification and switches sending back to the app. The checkbox then explains itself as You changed connection settings: save and run the test again before enabling. Save, test again, then tick it again.
What happens if you change plan
A configuration is never deleted when a plan changes. If you move below Pro, your host, credentials and sender address stay stored, the server section is replaced by the upgrade banner, and sending returns to the app's default route: your sender name is still applied and your address is still the reply address, so customers see no interruption. The badge goes back to Sending via: app default.
Move up again and your configuration comes back as you left it, verification included. Nothing is retyped.
Which emails this covers
Everything the app sends for your store: the result emails your customers receive, the test emails you send yourself from the Result email card, and the notifications the app writes to you. They all leave by the route this card decides, so a working server is worth testing once and forgetting.
What those emails contain, and how the result email is turned on for a quiz, is set elsewhere, see Result email.