Create your first quiz
A new quiz starts empty: you give it a name and a language, and everything the customer sees is yours to build. By the end of this page your quiz holds a question, meets the two conditions the app checks before publishing, and its badge reads Active.
Before you start
- myDiagnostic installed in your Shopify admin.
- At least one product in your online store, so an answer has something to point at.
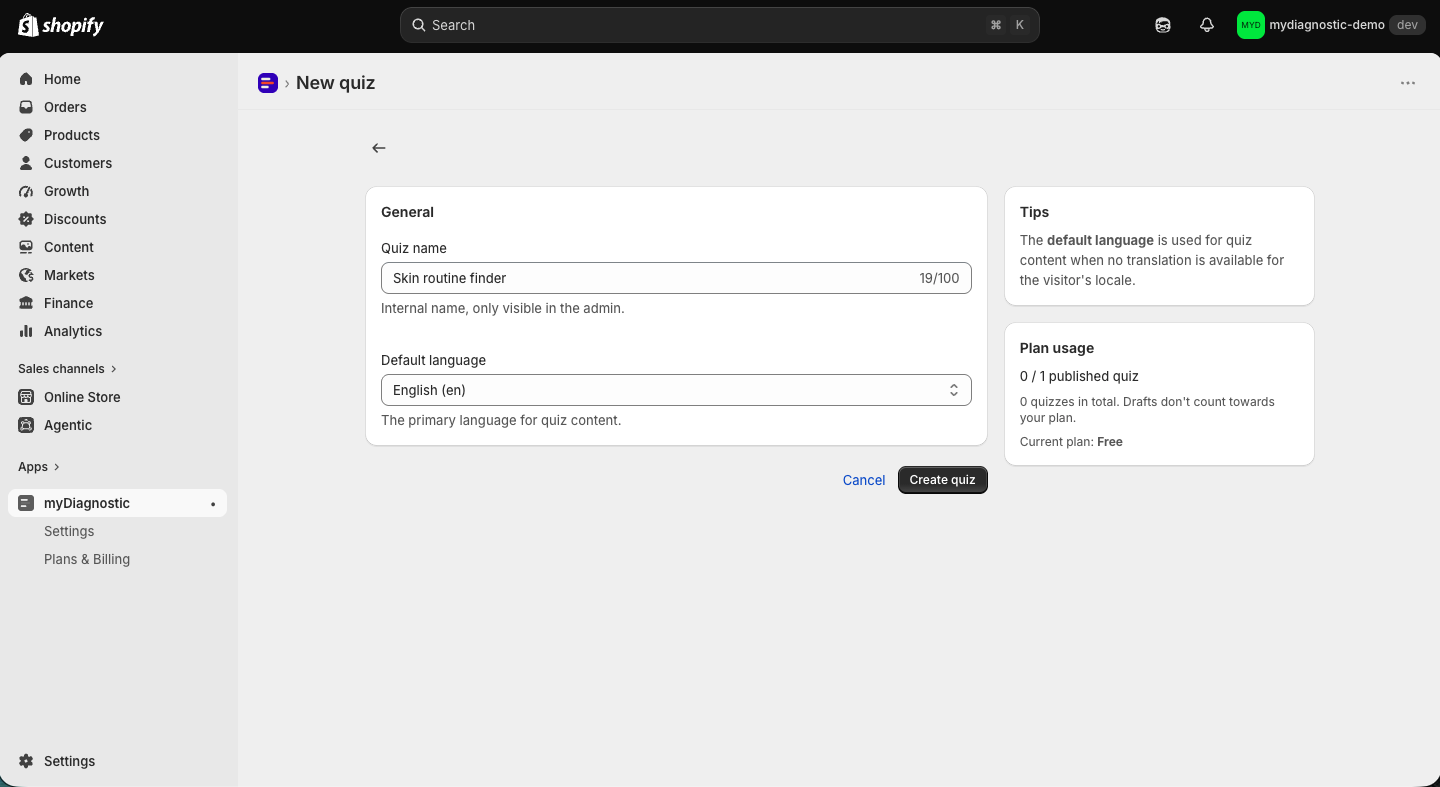
Create the quiz
- Open myDiagnostic in your Shopify admin.
- Select Create quiz at the top of the quiz list.
- Enter a name in Quiz name.
- Choose a language in Default language.
- Select Create quiz to confirm.
The form asks for those two things and nothing else. Everything else about the quiz is set later, in the quiz itself.
Quiz name carries the help text Internal name, only visible in the admin. The name identifies the quiz for you, in your quiz list and across the app, and it is used in the subject of the result email your customer receives. It never appears in the address of any page of your online store, so no customer reaches the quiz through it. You can change it later.
Default language carries the help text The primary language for quiz content. It is the language you write the quiz in, and the one a customer is served when no translation matches their own.
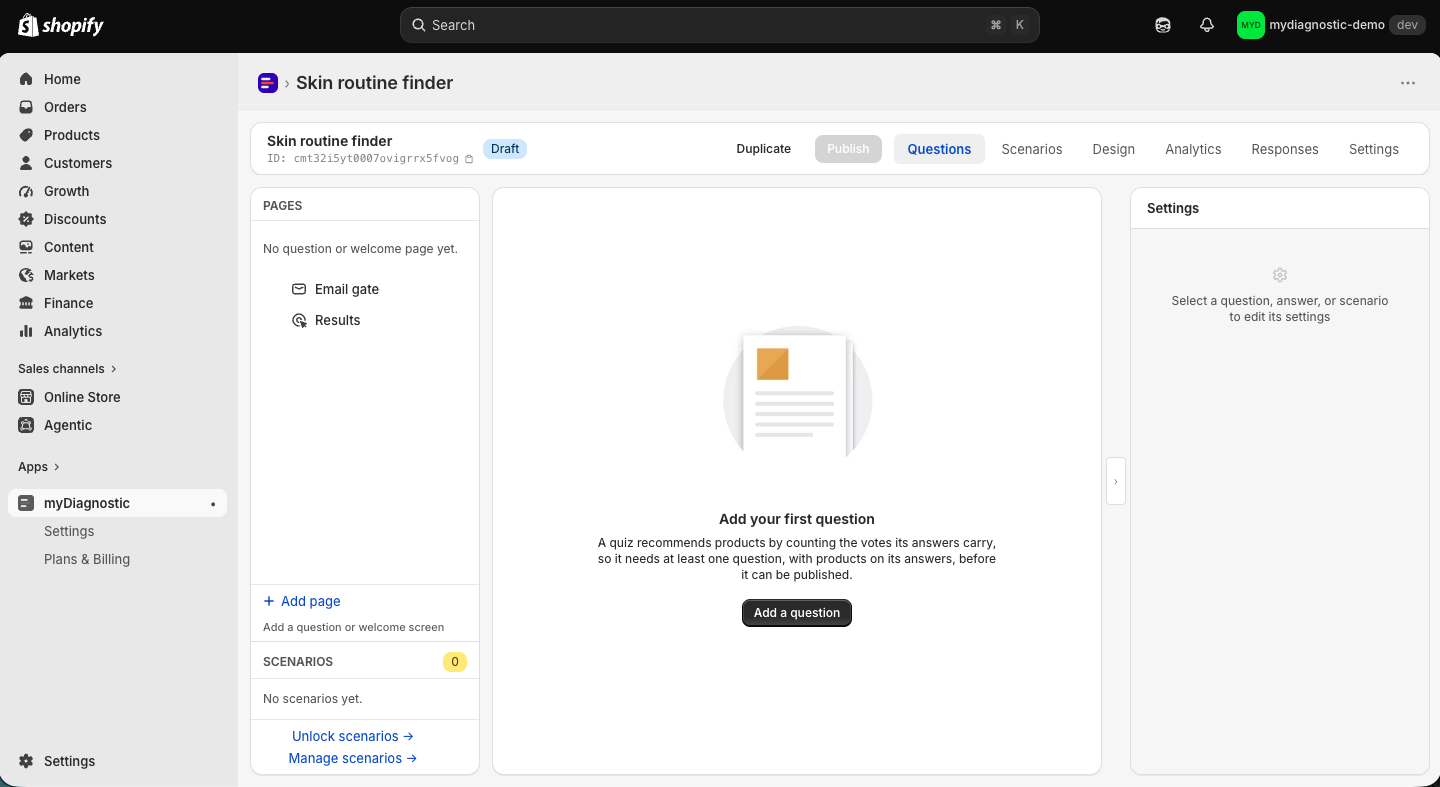
What a new quiz contains
You land on the Questions tab of the quiz you have created, and its badge reads Draft. A quiz in Draft is never served to your online store.
The left sidebar already holds two entries, Email gate and Results. They sit at the bottom of the list, they cannot be moved or deleted, and selecting either one opens its settings. Above them the list reads No question or welcome page yet. There is no welcome screen, no question and no scenario: the app creates none of them for you.
The middle of the screen shows no preview, because there is nothing yet to preview. It reads Add your first question, followed by A quiz recommends products by counting the votes its answers carry, so it needs at least one question, with products on its answers, before it can be published., and it carries an Add a question button.
The panel on the right reads Select a question, answer, or scenario to edit its settings until you select something in the sidebar.
The six tabs of a quiz
- Questions is where you build the quiz: the sequence of pages on the left, a live preview in the middle, and the settings of whatever you select on the right.
- Scenarios is where you write the editorial scenarios, each one pairing a trio of products with your own title, description and tips. Editorial scenarios need the Basic plan or above: on the Free plan the left sidebar shows Unlock scenarios in place of Add scenario, and what a scenario holds is covered in Result scenarios.
- Design holds the colours, the fonts and the layout the whole quiz is drawn with, with a live preview beside them.
- Analytics counts Total responses and Emails collected over a period you choose, and shows the Scenario distribution behind them.
- Responses lists the responses one by one and exports them with Export CSV.
- Settings holds the quiz name, the Behavior card with Auto-advance on answer, the languages the quiz answers in, the result email, the connections to Klaviyo and Mailchimp, and the Install on your storefront card.
Add your first question
Two routes lead to the same result, and both are available at any time.
From the empty screen
- Select Add a question in the middle of the Questions tab.
From the sidebar
- Select Add page at the bottom of the left sidebar.
- Select Question, described in the menu as Ask the visitor something.
The same menu offers Welcome, described as Intro screen with optional capture fields. That entry disappears from the menu once the quiz has a welcome screen, since a quiz holds one at most.
A new question arrives named New question, with no answers yet. Writing the question, adding its answers and choosing how they are displayed to the customer is covered in Questions and answers.
Publish the quiz
A quiz goes live only when it can return a recommendation. The app checks two conditions, both of them required, on the quiz as it is saved.
- At least one question. Until there is one, the reason reads Add at least one question before publishing: a quiz with no question cannot recommend anything.
- At least one product attached to an answer that does not exclude products. Until there is one, the reason reads Assign at least one product to an answer before publishing: without a product vote the result screen has nothing to show.
An answer that excludes products carries them only to take them out of the running, so a quiz whose product-bearing answers all exclude has nothing left to recommend, and the second condition is not met. Attaching products to answers, and excluding them, is covered in Product matching.
While a condition is unmet, Publish stays disabled and names the condition that is missing. Hover the button to read it, or open the Install on your storefront card in the Settings tab, where the same sentence replaces the usual status line.
Once both conditions are met:
- Save any change still pending in the editor.
- Select Publish at the top of the quiz.
- Read the confirmation, titled Publish this quiz?, which reads The quiz will be live on your storefront for any theme block referencing this Quiz ID.
- Select Publish to confirm.
The badge moves from Draft to Active. Select Unpublish to take a live quiz back to Draft at any time.
A published quiz still needs the app block placed on your online store before a customer can see it, which is covered in Add the theme block.
The limit on published quizzes
Your plan limits how many quizzes are Active at the same time. Drafts are not counted, so you can keep as many of them as you want, and a quiz costs you nothing until you publish it. The Free plan allows one published quiz.
At the limit, Create quiz is disabled in the quiz list, and a panel there offers View plans. The new quiz form, if you reach it anyway, shows a warning that reads Drafts are unlimited. Unpublish one of your live quizzes to free a slot, or upgrade to publish more at once., with an Upgrade plan button beside it.
To publish a different quiz without changing plan:
- Open the quiz that is currently Active.
- Select Unpublish.
- Open the quiz you want to publish and select Publish.
Duplicate a quiz
Duplicating gives you a working copy to change without touching the quiz your customers are answering.
- Open the quiz list.
- Select the menu at the end of the row of the quiz.
- Select Duplicate.
The Duplicate button at the top of the quiz editor does the same thing and opens the copy. The copy is made from the saved quiz, so save first: an editor with unsaved changes refuses and shows Save your changes before duplicating.
The copy is named after the original with (copy) added to the end, and it arrives in Draft, so it takes no published slot until you publish it. It carries the questions, the answers, the products attached to those answers, the scenarios and the translations.
Two things do not follow the copy.
- The responses already collected stay with the original quiz. The copy starts at zero, and so do its analytics.
- The Klaviyo and Mailchimp connections arrive switched off. The list and the tag are kept, and the connection has to be tested again before it can be switched back on, see Klaviyo and Mailchimp.
Delete a quiz
Deleting is done from the quiz list, on one quiz or on a selection of several. There is no delete button inside a quiz.
- Open the quiz list.
- Select the menu at the end of the row of the quiz.
- Select Delete.
- Type the name of the quiz in the confirmation field.
- Select Delete to confirm.
To delete several at once, tick them in the list, select Delete selected, and type delete in the confirmation field.
Deleting takes the quiz and everything attached to it: its questions and its answers, the products attached to those answers, its scenarios, its translations, and every response it has collected, including the email addresses in them. The result links already sent to your customers by email stop working, because the response each one opens no longer exists. None of it can be recovered, and the confirmation says as much: This cannot be undone.